
The goal here is to show you the fundamentals of what each knob on a standard compressor does and how it relates to applying it to your music. Compression is mainly for controlling uncompressed recordings. Most of the music that we use in our genre requires little to no compression at all. In hip hop, we do a lot of sampling and most, if not all, of our samples are already compressed. Even most of the drums in the form of kits are already compressed and pre-shaped. With this in mind, very little compression is needed.
Input Gain
The Input Gain is like a volume knob before you start compressing. This is where you set your pre-compression volume level, if you have a weak signal you can turn it up, if you have a signal that's a bit too loud you can turn it down.
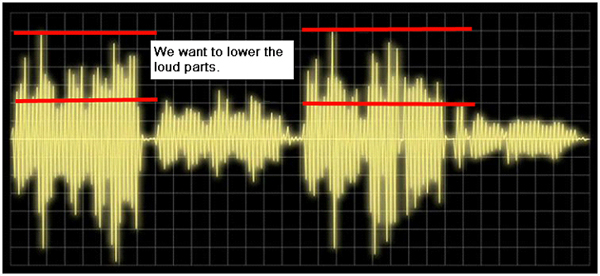
Threshold
The threshold increases compression as you turn the knob down, think of threshold as the level above which the compressor considers the signal too loud. In part 1 we discussed how compression squashes the loud signal in an attempt to make the volume more even with the lower signals. The threshold knob does that task. High setting means little to no compression, low setting means more compression.
Ratio
Your Ratio controls how much effort is used to correct overshoots. An Overshoot is the signal above your threshold. With a low ratio setting of 4:1, the overshoots will be gently pushed back towards the threshold whereas higher settings like a 11:1 ratio will be more like brutally forcing the overshoots back where they belong. Even higher ratios can be used to not allow them to cross at all. The thing to remember is that compression can re-shape a signal or sound, you do not want to over-transform that original sound, you just want to control it. You have to experiment and use your ears to obtain the outcome that you are looking for.
Attack and Release
This is where most people get confused or frustrated, but it's not hard to understand their purposes. Attack specifies how fast the compressor reacts in reducing gain. In other words, if you got in your car and turned your stereo on while it was on blast from the night before you would move at the speed of light to turn it down, where as if it were at a regular 'loud' setting you wouldn't have to react so fast. Same principle using your attack settings, it will control how fast the compressor reacts.
Your Release controls how fast the gain reduction resets. Both of these controls are usually in milliseconds. Don't get hung up on the numbers. The absolute best way to tackle these settings is to experiment with a one shot hit like a snare that has a loud initial impact and a short sustain, also experiment with something that has a soft impact but a long sustain like a guitar strum. You'll easily see how changing the values will effect the sound of both and then you'll understand how it applies to your music.
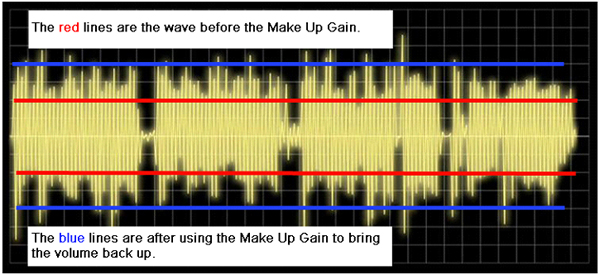
Make Up Gain or Output
Very simple, this is where you make up for any gain reduction during compression. Remember we squashed our loud parts which dropped the overall volume of the track, now we want to increase the 'more balanced' waveform back up to its original volume.
In Conclusion
I can't express how important it is to test using compression. It will definitely take your game up a notch or two. Just remember, compression should be used mildly for what we do unless you're doing live recordings. It's extremely important on vocals when the emcee varies in their volume. Also remember that we're talking about Dynamic Range Compression in general. There are many other types of compression that do different tasks. Continue testing and good luck!
Further Reading Related to Music Production
Last edited by a moderator: